


AERONCA C3 RESTORATION
By John Illsley
Beauty is in the eye of the beholder
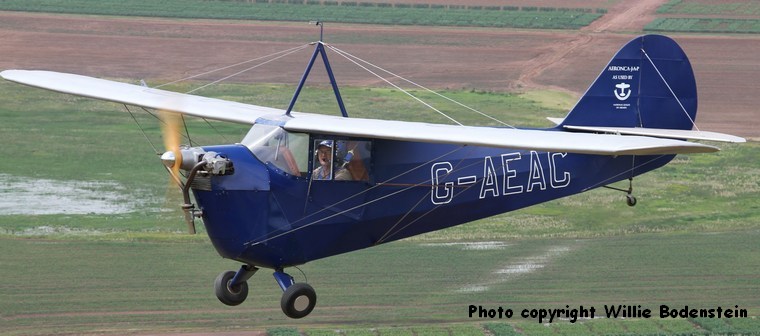
The Aeronca C3 rebuilt by me in Pretoria was built in late 1935 at the factory in Middletown, Ohio. It was one of 439 built between 1931 and 1936, making it one of the most successful light aircraft of the Great Depression when most aeroplane builders in the USA were failing. Its economy and ease of operation were big factors in its favour.
The Aeronca C3 that is the subject of this article is now unique in South Africa, although there were originally five. This one was privately owned and the others were on the training fleets of the Johannesburg Technical College and used at Rand airport and at Witbank. Being so low powered, the SAAF did not impress any into service during WW2 and the four technical college examples seem to have survived the war, but were never flown again. Reliable accounts have two of them thrown behind the hangars at Witbank, probably later to be scrapped.
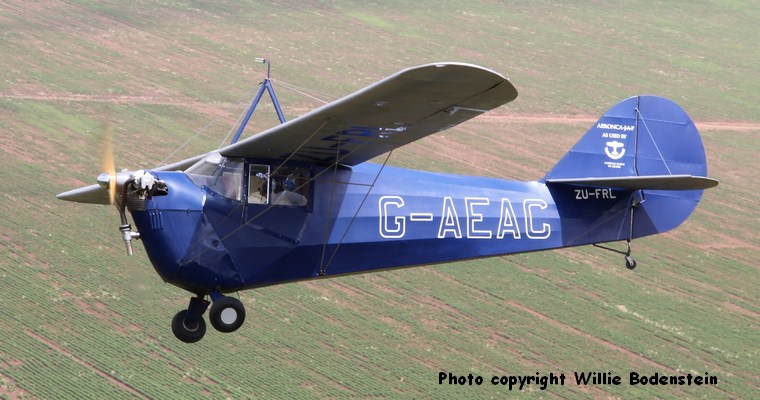
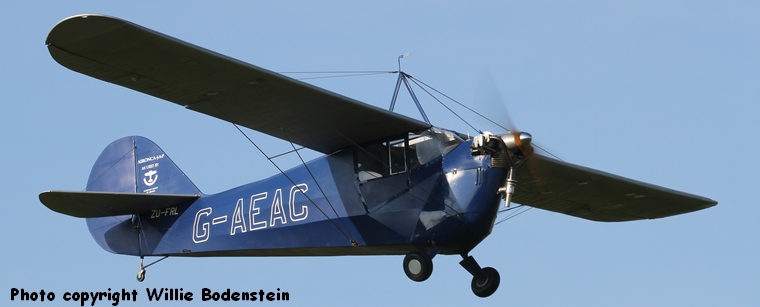
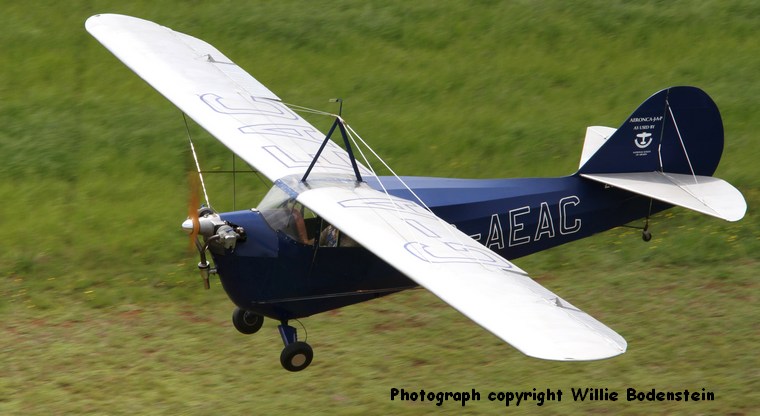
ZU-FRL is the only surviving airworthy C3 in the southern hemisphere
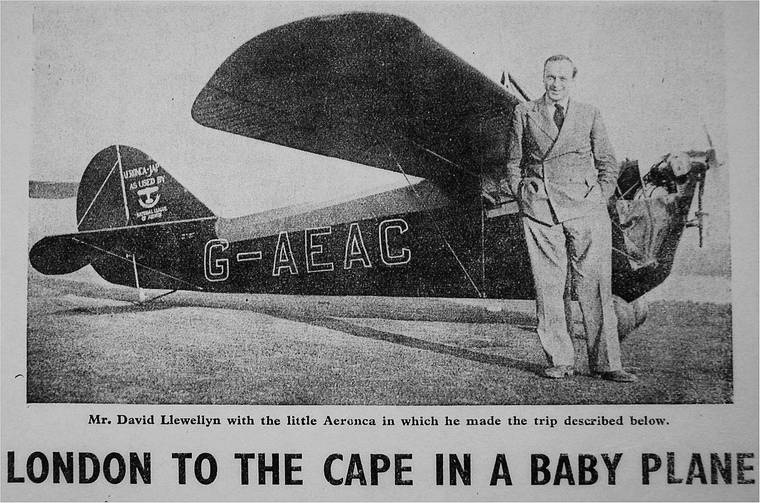
Part of what made my example worthy of rebuild is that it was flown to South Africa from England in 1936 by one David Llewellyn. This took a few weeks but the economical little plane (with all of 40hp up front) brought him safely to Johannesburg.
The remains of this aircraft were acquired in 1987 from Greg De Muynk who had it stored in a hangar at Brakpan-Benoni airfield. It was spotted when looking at an Auster Mk 5 which I subsequently bought and restored in authentic WWII SAAF markings. A serious start on the Aeronca to restore it to flying condition began in 1997.
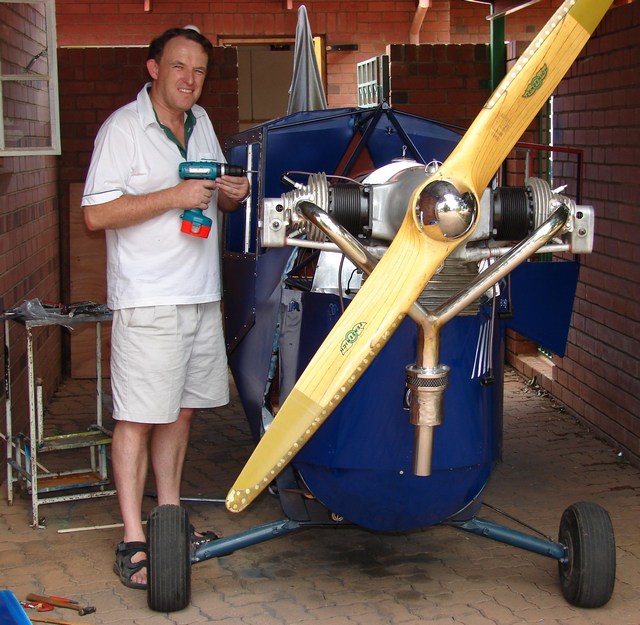
The first task to make an authentic restoration feasible was the tracing of an original engine. Several JAP J99 engines were traced in the UK, with one unused example being offered from the Orkney Islands! The single ignition Aeronca EC-113 engine is still common in the USA but I opted for the dual ignition British version made by JA Prestwick in the 1930s. (Also resisted the temptation to fit a C65 engine as has been done too many examples in the USA). The JAP engine eventually purchased was originally fitted in a Luton Minor and was the spare engine of Alan Hartfield who at the time owned the last Dart Kitten in existence.
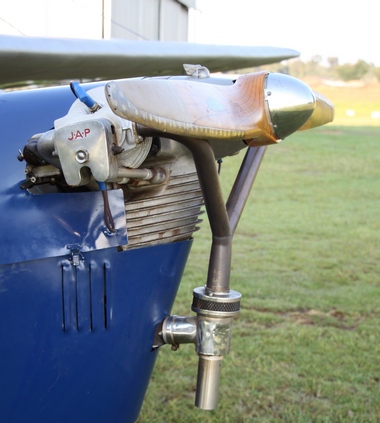
The JAP J-99 engine made by JA Prestwich
Original plans were ordered from Aeronca which still exists as a part of the Fleet Company, an aerospace group that now builds satellites. Most of the key drawings still survive and can be used as the basis for extrapolating other details found on missing drawings.
The restoration began with a rebuild of the engine and the repairs to the tubular steel fuselage frame. A major missing component was the U-shaped box frame to which the undercarriage attaches. Local engineering companies baulked at undertaking the making of a replica and so it was contracted to a man in England who, after doing the metalwork, had it welded up at a Rolls-Royce factory (although I don't think that Rolls-Royce knows that!).
The sourcing of original parts continued over years and across the world. Among items donated to the project or purchased for its completion were a carburettor from Australia; a rudder from Bristol; tail planes and elevators from Yorkshire; a king post from Warwickshire; most of the bracing wires from Seattle and a pair of oleos from Virginia, USA. The fact that more items came from England than America is partly explained by the fact that the Aeronca C3 was built for a few years under licence in England as the Aeronca 100 model.
The original cockpit style has been replicated with the use of period instruments and leather upholstery, although a few side panels in leather have been omitted to save weight. The back of the fuel tank (which sits at eye level in the cabin) has a distinctive padded cushion with a transparent map holder, all of which have been faithfully reproduced.
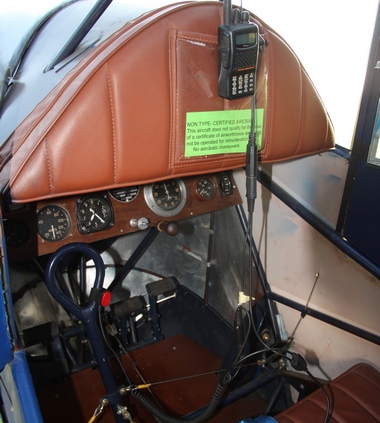
Instrumentation was basic to say the least
The correct wooden propeller for this engine is still made by Sensenich, but at a price. Costing over $1200 new, I did not anticipate fitting one of these but after making contact with an ex-Rhodesian living in Texas and also rebuilding a C3, I was fortunate to strike a deal in which he would let me have a new Sensenich propeller in exchange for a set of newly-made cowlings. All was well until a courier company (that shall remain nameless) damaged and then lost the replica cowlings I sent to America. Short of returning the propeller, I had no option but to make a second set. Having made three sets all in all (including one for my machine) I almost started putting serial numbers on each set!
The fuselage is of welded tubular steel construction with the fin built integral to the fuselage frame. From the original plans it is evident that the factory did not use 4130 Chrom-Moly more than they absolutely needed to and much of the rear fuselage is in fact 1025 mild steel. Any replaced tubes in the restoration have utilized 4130 steel for added integrity. The triangular-shaped fuselage (when viewed in cross-section) gave the earlier C2 models their distinctive "razorback" appearance. The later C3 models (including the 500 series Master) had an identical frame but were given a rounded appearance with the use of wooden formers and stringers.
When the fuselage restoration was almost complete a pair of motorcycle "mono-shocks" were fitted in place of the original oleos as none of these could be traced at that stage. Although of the correct size, the shock absorption rate was completely inappropriate. This makeshift alternative did allow for engine running to be done in the driveway of my house, but would never have sufficed for flying. A further internet appeal brought a pair to light in the USA and these have now been fitted after some refurbishment.

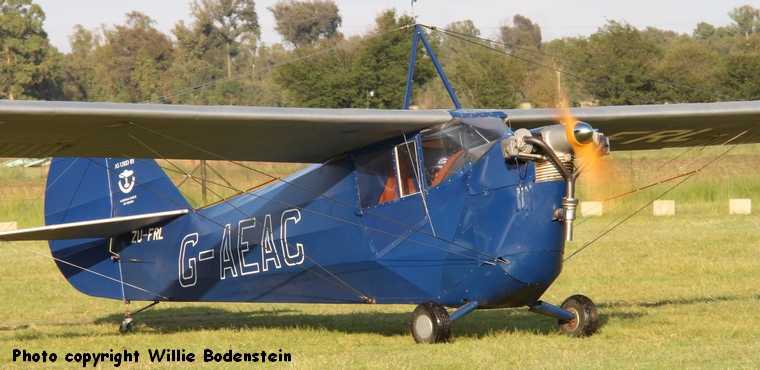
Being so low powered, the SAAF did not impress any into service during WWII
The biggest challenges in rebuilding the C3 have undoubtedly been the wings and the ailerons. More than half of the man hours over the past twelve years have been expended on these items. The wings looked simple on the drawings, but as every homebuilder learns, this is very misleading. A case in point was the main spars which I estimated would take two days to make and took over three weeks. These are mainly of Sitka Spruce, but the plans show that the mid-spar reinforcing (where the wing bracing wires attach) uses maple wood as a stiffener. The origins of the C3 in the 1920s (when the C2 was built) are very evident in the Curtiss Jenny style technology that was utilized in the wing design: the internal bracing is all based on piano wire and turnbuckles which have to be tensioned to approximately the same values. It is akin to tuning a giant harp as you judge the tension partly by the note emitted when you strum each wire!
Although ostensibly an "all wood" wing, there are in fact dozens of metal fittings that help to brace the wing; act as fasteners and serve as the aileron attachment points. A trip to New Zealand a few years ago led to a donation of some original fittings for the wing, including all the original pulleys. The ribs (which use the Clark-Y aerofoil) are built up as a girder construction from spruce and are complicated somewhat by the different thickness of the spars at various points along their length. All gluing on the wings used Ciba Geigy Araldite, a two pack epoxy-based glue. The Araldite combination for wood was pioneered in SA some years back by John Dunbar for use in laminating timber for Tiger Moth propellers, and was certified for such use by the CAA.
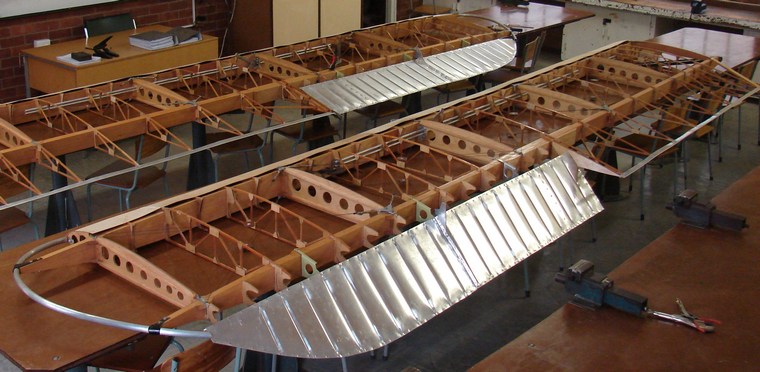
The wings looked simple on the drawings, but as every homebuilder learns, this is very misleading
The making of a pair of ailerons proved to be a major headache. The originals were fabricated from paper-thin .010 aluminium and were the first metal ailerons fitted on an American light plane. This material is no longer available and so the thinnest Alclad now available (.016) was substituted. The first attempt to replicate the corrugations was by way of male and female moulds which it was hoped would allow the skins to be pressed out using a three ton press. This proved to be a disaster as the moulds punched out the corrugations and tore the material. Back to the drawing board! More research on the originals showed that the corrugations were probably done one at a time. At the leading and trailing edges the V-shaped corrugations were rather crudely flattened prior to riveting the upper and lower skins. I built a simple press to form each corrugation and painstakingly inserted these by hand. Having taken the metal components as far as I could, a friendly "tin basher" was recruited to do the riveting work required. At several stages I was tempted to build the ailerons from wood as was the case with the British Aeronca 100. This would however have made the restoration something of a hybrid and would have detracted from its authenticity and so I persevered with the original American design for these components.
One aspect of the restoration that I avoided for as long as possible was the problem of bracing wires for the wings and the tailplanes. Only one company still makes the streamlined wires needed and that is Bruntons in Scotland. Their service is good and the stainless steel wires are beautifully made, but having something of a monopoly their prices do make one break into a cold sweat! I had bought an almost complete set of original wing bracing wires at one stage, but about half proved to be beyond repair and with such critical components you cannot take a chance. So biting the bullet, I placed an order with Bruntons and made sure my wife didn't see the invoice!
The wing bracing wires are attached to the spars via a set of straps that were originally made from 5mm thick 1025 mild steel. In making replicas, the original drawings were converted to CAD and the items cut using high pressure water so as to limit any changes brought about by heat during the cutting process.
Some anecdotes relating to the rebuild:
One of the responses I had to internet adverts was from an old gentleman in the Orkney islands who phoned me at 3am in the morning believing that he was phoning several time zones back (to the USA) rather than two hours ahead of GMT to South Africa! His broad Scots accent at that time of the morning didn't help negotiations, but ultimately he wanted too much for the engine and no deal was struck.
Having spent most of my aviation savings on the JAP engine I couldn't afford to ship or air freight it out to SA. As with so many other parts the engine was brought in pieces by an SAA Captain friend who gave each air hostess a piston, cylinder or exhaust while he trundled the crankcase on as hand luggage. On arrival in SA all of the cabin crew surrendered their parts and the engine came through customs as a heap of parcels, with needless to say, no commercial value!
The carburettor was found in Australia and like many components was brought back by a kind and long suffering SAA Captain. However, his son, a pupil at the school where I teach, left the item in the baggage trolley and only remembered it when half way home. When he returned to the airport, post haste, the bag with the precious carb had been surrounded by the police who had called in the bomb squad. It was saved in the nick of time!
Once the engine was in the fuselage frame it just had to be run. This was achieved by pushing it on to the veranda (from the sun porch that served as a workshop) and firing it up. On one occasion this was done for the benefit of the boys in my Aeronautical Society at Pretoria Boys High School. Unfortunately the propwash blew a set of lace curtains outwards and these were promptly trimmed down by about a metre. This, needless to say, caused much hilarity and elicited from one excitable boy the observation: "Sir, your wife is going to kill you!"
"Sir, your wife is going to kill you!"
An epic flight
Interest in the type from the Johannesburg Technical College, which then had the largest civilian training fleet in South Africa, led to Flying Officer David Llewellyn, an RAF pilot on leave, undertaking to fly this example to Johannesburg so that, in his words 'its practicability could be fully demonstrated'. To facilitate the flight an additional fuel tank was fitted in the right-hand seat (allowing for ten hours duration) and a few blind flying instruments added changes which pushed the little craft's weight to the maximum permitted.
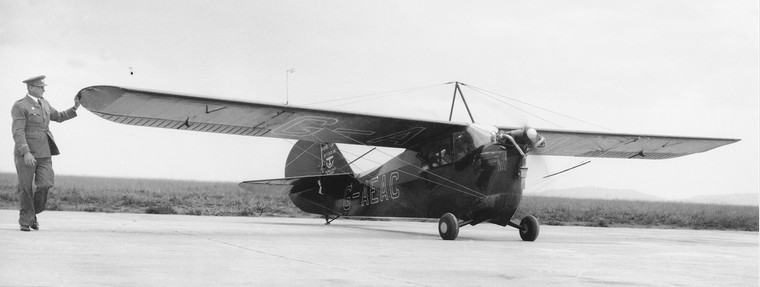
David Llewellyn, a RAF pilot on leave, undertook to fly the C3 to Johannesburg
Llewellyn faced flooded airfields in Italy (his plane was carried to a neighbouring road to take off); sandstorms over Libya and tropical storms over central Africa, one of which almost ended the flight when he was forced to land in a clearing in Tanganyika, today Tanzania. When the storm passed he found that the small engine simply could not lift him off at 6500 above sea level. An attempt to launch the C3 off a ramp of soil also failed and in desperation he decided to fit the pair of high compression pistons he was carrying for an aerobatic display to be performed in Johannesburg. Using only rudimentary tools (one of which was his nail file) he set to work and was almost finished with the second piston when a circlip from a gudgeon pin flew off into the veld. Searching on hands and knees for five hours, fortified only by Ovaltine from his flask, Llewellyn eventually found the part, finished the job and flew out of the clearing!
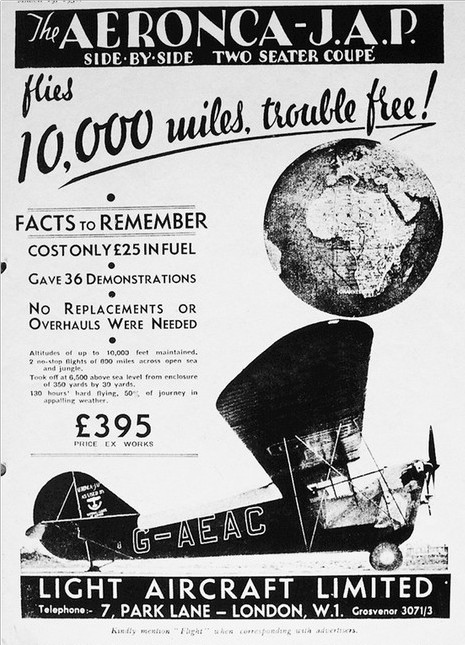
130 hours from the United Kingdom to South Africa
The 9000 mile flight was completed in 130 flying hours over 21 days using less than 1700 litres of fuel , this economy being much emphasised in advertising by the aircraft's British distributors after the flight.
What is it like to fly?
The first challenge is to gain access to the cabin. To reach either door requires one not only to duck underneath the wing, but to weave through the bracing wires and then, still bent double, to launch your torso backwards into the cabin, pulling in your legs last. Having performed that contortionist's act you are rewarded with a leather upholstered bench seat that will seat two people. On the highveld the C3 is strictly a single seat aircraft which allows plenty of elbow room for the solo aviator. A single control stick with a spade grip is situated on the left, although there are two sets of rudder pedals. A triangular cushion dominates the cabin and hides the fuel tank which is above the narrow and angled instrument panel that holds an ASI, altimeter, rev counter, oil pressure and oil temperature gauges. Fuel level is indicated by way of the trusted cork and wire arrangement, with the wire visible just head of the windscreen.
Starting is best done with two people: one in the cockpit and one at the prop to act as the 'Armstrong' starter. With no primer, the prop swinger needs to throw a liberal dose of fuel directly into the air filter and then with the throttle fully open pull the propeller through six blades, followed by the same procedure but with the throttle now fully closed. Then it is the standard drill of 'stick back, brakes on, throttle set and both magnetos on'. If you have done it right, the JAP should fire on the first swing, the seventy-six year old, two cylinder motor roaring into life with a sound like no other aircraft engine in the country.
The aircraft wafts gently into the air, giving an early indication of the low power and slow speed
Despite its simplicity the C3 does have a pair of true oleos encased within a robust u-shaped fuselage frame and this affords one a surprisingly comfortable ride over the tussocks of a grass airfield. Because of large heel brake levers, it is easier to steer with these rather than with pure rudder inputs, partly because the plane has a fully-castoring tail wheel (replacing the original skid).
Pre-take off checks are very limited: no flaps, no mixture control and permanent carb heat mean that you are simply left to double check that the fuel is selected 'on', note correct oil pressure, test each magneto and ensure that you have full control response on all three axes. After a quick radio call, it is advisable to take a 'running start' from the holding point to the threshold so as to use every ounce of available momentum for the take off run.
Applying throttle at the threshold gives one an increase in engine noise and very slow acceleration as the limited number of horses up front do their best to propel you forward via a wood Sensenich propeller that is optimised for engines of around 40 horsepower. The slow acceleration is useful for getting used to the balancing act required from the narrow track undercarriage combined with long wings. However, large control surfaces give one ample control from the very start of a flight.
Applying throttle at the threshold gives one an increase in engine noise
The moment of take off, at about 40 knots, is decidedly un-dramatic and the aircraft wafts gently into the air, giving an early indication of the low power and slow speed that will characterise the entire flight envelope! Having said that, the take off run is no further than a Piper Cub or Pietenpol with two aboard and using a 65hp Continental. As recommended in the original operator's manual, gaining 50 to 55 knots in ground effect gives one a good margin of speed for undertaking the climb which can be commenced long before the end of the runway and so is not as alarming as it sounds.
Gaining 50 to 55 knots in ground effect gives one a good margin of speed for undertaking the climb
The rate of climb is predictably slow at around 150 to 200 feet per minute. Throttled back to 2200rpm, the Aeronca will cruise at 60 knots indicated. The low wing loading affords a pleasing agility with low control forces required, but it also means that any thermal activity is very evident. The latter attribute was probably exploited by those very patient American pilots who in the 1930s coaxed C3s to altitude records of over 17 000 feet! A wings-level stall is a non-event with the nose nodding downwards in line with its generally docile handling which, I'm told, only change to bad tempered if stalled off a climbing turn.
Don't be dismayed by cars overtaking you, as this was never a speed bird!
As on the ground, the Aeronca C3 simply oozes character once airborne and one needs to savour the sight of the bracing wires trembling in the airflow; the valves at eye level clattering away and the slow pace at which features on the landscape pass by. Don't be dismayed by cars overtaking you, as this was never a speed bird! Without deriding the many excellent attributes of modern microlights, I don't believe they will ever exude the kind of vintage charm so evident in the first generation of 'ultralights', as this class of aircraft was originally termed.
The Aeronca C3 simply oozes character once airborne
Returning to earth can take the form of a gentle circuit aiming for 55 knots on finals, or, if you are more impatient, side slipping off excessive height on the final approach. The docile handing continues right up to the landing and both wheeler or three point landings are a pleasure. As you taxi back to the hangar you have one last chance to absorb the atmosphere surrounding flight from the golden age, where the foundations of what we take for granted today were still being laid.
Acknowledgments
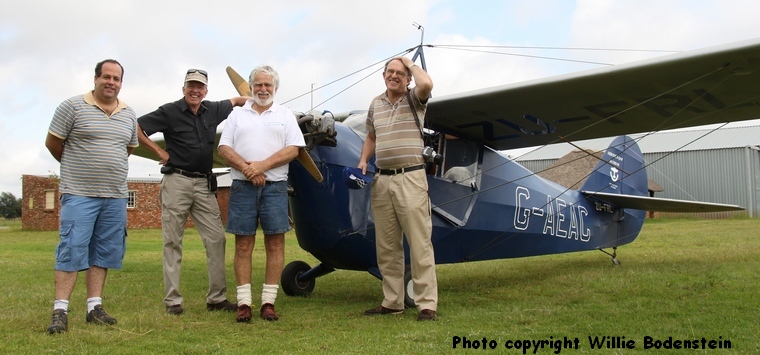
Left to right: Ivan v/d Schaar, Captain Brian Stableford, Captain John McKerchar and John Illsley
A great many people made the restoration and flying of my Aeronca possible and in conclusion I would like to thank some of the key figures in this fifteen year odyssey: Greg De Muynk, Gareth Fisher, Alan Hartfield, Nick Chittenden, Ben Cooper,John Houser, Nigel Ponsford, Captain Adriaan Fischer, John Sweeney, Paul Ewart Phipps, Mike Spence, Captain John McKerchar and Captain Brian Stableford. Finally thanks to Ivan van der Schaar for flying the camera ship for the accompanying photos and Willie Bodenstein for the photography.
 |
 |
 Copyright © 2024 Pilot's Post PTY Ltd
The information, views and opinions by the authors contributing to Pilot’s Post are not necessarily those of the editor or other writers at Pilot’s Post.
Copyright © 2024 Pilot's Post PTY Ltd
The information, views and opinions by the authors contributing to Pilot’s Post are not necessarily those of the editor or other writers at Pilot’s Post.